Photo by Mike Sàez on Unsplash

Any transition in life can be difficult, especially if you want to remove bad habits and adopt positive ones. Whatever kind of transition you’re considering, you can make the most of this time to adopt new habits that can improve your life. Here are some ways you can use a major transition to remove bad habits and embrace positive ones. 


Choose a Substitute for Your Bad Habits 

You need a plan ahead of time that will guide you on how to respond when you face boredom and stress, which triggers bad habits. It’s difficult to get rid of bad habits, so you replace them with something else. If you smoke, you must consider something you will always do when the urge to smoke is triggered. Whatever bad habits you’re dealing with, you need a plan for the things you will do instead of the bad habits. 


Cut Out Triggers 

If you smoke after drinking, you should avoid going to a bar. Look at things in your environment that encourage you to engage in a bad habit you would like to get rid of. Deal with those triggers and you will make it easier for yourself to get away from the bad habits. Your environment makes your habits easier, so if you want to embrace good habits, create an environment that offers triggers that will lead you to the right things. Change your environment and you will have an easier time changing your habits. 


Join Forces With Somebody 

Sometimes, it’s hard to drop bad habits if you don’t have someone to support you. Pair up with someone on the same mission and partner up on exploring new hobbies that will help both of you quit your bad habits. Through your partnership, you can hold each other accountable, and when you win, you can celebrate your victories together. Knowing someone expects you to be better is a motivator that will push you to adopt good habits. 


Eliminate Stress and Toxic Relationships

Being stressed can encourage bad habits like smoking, procrastinating, skipping meals, and drinking too much alcohol. Check if there are relationships that are draining your energy and walk away to protect your mental health. If you need assistance, speak with a counselor to know how to approach a stressful patch of your life without triggering other problems. 


Make Healthier Choices 

One of the things you should do if you have a major transition in your life is embracing healthy living habits. Opt-out of nutrient-dense foods and eat for your immunity. Choose foods that help your brain release the pleasure chemical, which helps you deal with stress. Also, replace habitual sugary treats with healthy snacks. 


Deal With Stress From Work 

Many people suffer work-related stress, so if this is your experience, there are things you can do to improve your situation. If you’re in a job that does not challenge you, you can change your career. Switching your career can offer great mental health benefits. There are online degree programs you can enroll in that help you learn skills while still working full-time. When searching for an online school to enroll in, check to ensure it’s accredited. Also, compare tuition rates to know if your budget is sufficient. Another way to deal with work-related stress is by taking a break to clear your mind. Even a few days can be a healing moment, so check if this is something you can get if you’re employed. 


Conclusion 

It’s possible to get out of bad habits if you can learn how to transform your lifestyle. Join people on the same journey as you to get the motivation to move on from bad habits. Also, embrace hobbies that encourage you to engage in things that improve your lifestyle. Start by signing up for Optimal Fitness’ group and one-on-one fitness training.


by Jennifer Scott

Image via Pexels


Understandably, the pandemic is causing many of us to feel more stressed and anxious than usual. This is especially true for those running businesses as they manage employees during these uncertain times, as ZenBusiness explains here. In fact, the more employees there are to manage, the more stressful the job. 


No matter who you are, there are five key things we can do to care for our minds and bodies during these challenging times—even if we can’t unwind and alleviate stress at the gym, yoga studio, or a Sunday brunch with friends. Optimal Fitness offers the following resources for your COVID-19 wellness journey. 

1. Eat Nutritiously

  • Your diet is an important aspect of strengthening your immune system.
  • Perform grocery runs in the safest way possible.
  • Another option is to have food delivered straight to your door.

2. Prioritize Home Fitness

  • Staying home can take the spark out of your workout, but there are ways to maintain your motivation. 
  • The right equipment can help you get more out of your home fitness regimen. Adjustable dumbbells, resistance bands, and even headphones can all boost your home workout!
  • Set up a virtual meeting for online home workouts

3 Try Yoga and/or Pilates

  • There are certain poses that can help relieve stress, including the Chair Pose and the Hand Under Foot Pose.
  • When you are not able to connect with your yoga instructor, you can use apps like Fiit and Gaia to supplement your regimen. 
  • Some Pilates videos can help round out your fitness and wellness plan. 

4. Practice Self-Care

  • There are also some free ways to practice self-care.
  • Men can also benefit from self-care practices
  • Find ways to abolish negative energy from your household, including decluttering and incorporating a few indoor plants to help purify the air.


We can’t control much of what’s going on around the world right now, but we can make our health and well-being a top priority during this time of uncertainty. By eating nutritiously, practicing self-care, and staying physically active, we’ll keep our minds and bodies healthy—and we may even develop a new love and appreciation for working out from home. 

Whether one-on-one personal training or group training, the certified personal trainers at Optimal Fitness develop individualized programs for each client. Contact us for more information today! 571.207.8627

by Cheryl Conklin

When it comes to health and mental wellness, most people overlook the importance of sleep. But the truth is that getting enough high-quality sleep every night is vital to our long-term well-being. Since the brain and body undergo essential restorative processes during sleep, sleep deprivation can contribute to a whole mess of physical ailments and mental disorders. Check out the below resources from Optimal Fitness to learn how you can improve your sleep and enjoy better days!

Rethink Your Sleep Environment

Making a few tweaks to your bedroom can help you fall asleep faster and reduce the frequency of night-time waking.

  • Do some redecorating to turn your bedroom into a calming sleep sanctuary.
  • Burn some sage to clear out bad vibes from your bedroom.
  • Your body temperature naturally drops during sleep. If your bedroom gets too warm at night, the heat can make it difficult to fall and stay asleep.
  • If you don’t have air conditioning, try angling a fan towards your bed so it can blow directly on you while you sleep.
  • Sleep in loose pajamas in breathable fabrics so you don’t overheat.
  • Pregnant women and new moms can find stylish options that simplify nighttime feedings to minimize disruptions in your sleep schedule.

Banish Stress From the Bedroom

If stress is keeping you up at night, look for ways to treat stress through healthy daytime habits like exercising and eating nutritious foods.

  • Consider hiring a wellness professional for help with meal planning, mental health treatment, and fitness guidance.
  • Exercise daily to reduce stress hormones, relieve muscle tension, and support your brain health.
  • Optimal Fitness has a variety of classes to help you break a sweat in the name of better health.
  • Eat foods packed with stress-fighting vitamins and minerals.
  • Wind down in the evening with a relaxing yoga routine. Yoga can also help alleviate back pain, joint pain, or muscle stiffness that’s disrupting your sleep.

Try Natural Remedies

If you could use some extra help relieving stress and relaxing for the night, consider trying some natural supplements like magnesium and l-theanine.

  • Research suggests that magnesium supplements can improve sleep quality while also enhancing the treatment of anxiety and depression.
  • L-theanine promotes relaxation by calming the body’s stress response.
  • If you need to treat occasional insomnia, trymelatoninbefore reaching for addictive prescription sleeping pills.
  • Taking steps to improve your sleep is the ultimate act of self-care. When you sleep well, you’ll find it much easier to cope with stress, anxiety, depression, or any other mental concern that you’re experiencing. Try incorporating some of these healthy sleep habits into your routine today!

By Cheryl Conklin

Forget Spring, We prefer year long Cleaning!!

Why do we clean?

Cleans are the most powerful barbell movement we will do. It requires you to derive power from the entire body which requires synergistic recruitment of muscles in both the lower and upper body, as well as posterior or anterior chains. The clean can help improve power in the body that can translate to other movements. It’s also a movement that requires bilateral symmetry due to the nature of the movement. If one side of the body works harder than the other, the bar isn’t gonna get up. The clean is a great movement to master because of the benefits you get either in preparation, building mobility as well as body mechanics and awareness or in the subsequent perks of building strength and power that translates to other movements to burning tons of calories while improving neurological function. We all need cleans!


Much different than a squat, the clean won’t look very different from person to person. While they are much more difficult for people with longer levers, each piece of the movement from the pulling to the catch, it should look similar on each person. 


Steps

  1. Foot Placement. Start with feet at hip width. (Why? A foot placement that is too wide can take away power from your jump and pull. Too narrow of a stance makes your pull much longer and requires bigger take off which will cause the bar to float higher.)                                                                                  
  2. Bar Grip (wrapped vs unwrapped). An unwrapped grip can help your catch with lighter weight. As the bar gets heavier, you’ll need a stronger grip to be able to catch the bar.                                                       
  3. Straight back and core braced – Like in a deadlift, a straight back is important for preventing breakdowns in the movement. (Why? Without a straight back, you lose engagement in both the glutes and core.)                                                                                                                                                              
  4. Shrug. The shrug commences the upper body portion of the lift and helps generate power from the shoulders. (Why? Without the shoulders and pulling portion you won’t be able to commence to a catch. The shrug helps pull that bar up to progress to the swinging forward of the elbows.)                                    
  5. Straight arms, elbows out and rotate in/forward. The straight arms are gonna help avoid the reverse curl movement. Elbows out helps keep the back straight as well as the arms straight, tightening the triceps to help keep the arms straight. Movement by beginning elbows out will make the upward movement of the bar easier to keep close to the body. Don’t bend at the elbows. The elbows should shoot straight up after the first pull. (Why? Bending the elbows makes the pull much more difficult. It’s easier to catch the bar lower than to pull heavy weight all the way up the body. Because the transition from internal rotation of the shoulder at the beginning of the movement, to an external rotation at the catching portion of the movement, keeping your elbows straight as well as the arms helps maintain an internal rotation of the shoulder throughout the crucial power output phase of the movement.)                      
  6. Hips/Jump – As the clean is a triple extension exercise, you’ll simulate a jump because you want extension in the ankles and the hips to properly generate enough power from the lower body. (Why? The hips are a lot like rubber bands, they generate a lot of power. Try to pop those hips and drive them forward to generate as much power as possible.)                                                                                              
  7. Punch elbows forward. The catch may be one of the most difficult parts of the clean. Elbows must remain high. (Why? Keeping the elbows high helps position the bar properly so that it is resting on your chest and front delt. If you catch the bar with elbows too low, you will catch the bar on your hands and in the wrists which puts unnecessary stress on the wrists. Plus with the elbows being too low, you’ll catch the bar in front of your body instead of stacked on your body which will leave more opportunity for a missed catch. Your body as a whole has more power for stabilization than the wrists and forearms.)

Helpful Hints

Think of swinging your hands and elbows under the bar. The hands will do a full 180 degree rotation around the bar so during the pull to the catch thing about swinging your hands all the way around the bar. This can also help get the elbows up high. 


Internal shoulder rotation the beginning and external in the end. 


Keep shoulders above the bar


Brace the core


Your hands DO NOT have to be gripping the bar in the rack position like they would be in the pulling phase.


Common Mistakes

On a hang, don’t drop bar to far beneath the knees

(Simple fix, just don’t drop the bar too far. Keep it above the knee)


Shoulders dropping with bar can lead to bar traveling further away from the body

(Tighten back and keep bar close to the body)


Gripping the bar during the catch and rack. 

(fix by trying to unwrap your thumbs when catching.)


Setting up with the bar over the toes.

(If you start over the toes, the bar path becomes rounded instead of straight, slide the hips back and start with the bar over midfoot)


Lifting the chest too high

(Keep the back over the bar, lifting the chest too high will lead to a backwards lean. Unlike that you’d do in a deadlift, lifting the chest can take away the power from the lower body and instead engages the lowerback)


Assessments

A simple rack position test, just simply place your thumbs on your collar bones and see what position your elbows rest in. Too wide is most likely lat tightness, too low is from shoulder tightness.


Sit on the floor with an x mark, sit with a straight back and put your hands across your chest and rotate with either a pvcp pipe or straight object and rotate your torso. The bar should cross across the front of the x of which you’re sitting on.


Sit criss-crossed on the floor against the wall. While holding a pipe or light, wide gripped object, see how far you can go back to assess tight lats for the rack position. Grip the bar in both a regular as well as reverse grip.


Improving The Rack Position

The rack position can be the trickiest part of not only a clean, but any front loaded bar movements. The rack position is what we see in the photo above, the position in which you put the bar on your front delts and chest. Due to a lack of shoulder mobility, wrist and forearm tightness or lat tightness, the rack position can be a tricky skill to attain. An important que to try to remember is get those elbows up as high as possible. By the time you catch the bar in the rack position you won’t have a full grip on the bar, the way you did in the pulling part of the movement. Here are a few ways to try and improve that tricky rack position.

Partner forced rack position hold. With the bar on the rack start in the rack position. From there, your partner will push your elbows up to force an exaggerated rack position. This will help you not only gain familiarity with the position, but loosen up those lats to get that position more comfortable.


Next we’ll need to try to gain some flexibility and range of motion through the wrists. To do this, we’ll start on all fours. Straighten the arms and shift the weight of your body forward moving from your shoulders starting stacked directly above the hands to the bottom of the chest being over the hands. We’ll perform this a few times and from there we’ll progress to your hands beginning sideways. From there we will shift the body weight side to side over the hands. After a few reps, we will finally rotate the palms backwards, fingers facing the knees. In this position, we will push our body weight backwards to bring a stretch to the bottom of the forearms.


After we loosen up the wrists we’ll go to another forced rack position. This time you’ll just need a band to wrap around your wrist. From there, face opposite of the band and lift your elbow up in a front rack position and just let the band do its job as it pulls that wrist down as well as bringing that elbow into your rack position.


The last thing is just simple front squatting. The front squat is the best way to practice the rack position as the bar holds you into that position throughout the movement. Simply put, squats fix everything


Mobility and Stretching

Lats

  • Rotated rack pull. Have the side of your body face the bar. Reach your opposite hand over top of your body to grab the bar. Pull your body away from the bar with your hand braced against the bar.


  • Foam roll


  • Cat cow. On all fours, round out your upper back and slowly push the chest down out of the rounded back into an arched lower back.


  • Down Dog. Start in a pushup position and with a straight back, push your butt straight back, while keeping the arms and legs straight. (To intensify the stretch, drive your chest towards your legs)


  • Elbows up stretch. Find a wall or bar and reach your elbow up vertically towards the ceiling and press your tricep against the wall. Press your weight into the arm or step forward past the arm.

Shoulders

  • Prone pipe Y raise. In a prone position on the floor with a straight object and arms extended, raise your arms up straight above you. Try to get the object above your head and shoulders. 


  • Hand on wall stretch. Find a wall and hinge at the hips. Straighten your arms out and brace the wall with your hands. From there sink your chest to the floor while maintaining your hand position.


  • Band on bottom of rack each behind your head as if you were going to perform a tricep extension laterally, but allow to band to pull your hand to stretch the shoulder and triceps as well as the lat.


  • With a pipe or strap, grab the object from the top behind the head and from the bottom below the waist with the bottom hand.


Hips

  • Squat to stand with hands on feet or ankles. Squat down and wrap your hands around your ankles or hold your hands above your feet. From there extend the knees and lift the butt.


  • In a deep squat, press your elbows out against your inner thigh.


  • 90 degree hip rotation and presses. In a seated position, put both legs at 90 degrees, rotate your torso to face the front leg, press onto your knees through your hips. Rotate your legs so the opposite knee is facing forward and repeat.


Thoracic

  • Start kneeling with your elbows on box or bench and curl pipe behind the head


  • In childs pose, forearms straight out in front of you on a foam roller and sink chest towards the ground.


  • In a seated position with a bar on your back, straight back and rotate.

Closing

Always remember that the clean is a very violent and aggressive movement. If you don’t attack it as such, it will fight back!

Now as we said before, we would be posting about the article pitting two of the most popular methods of training against one another. Total body training, training major muscle groups each day versus Split routines, dividing your workouts into a couple body parts a day, rather than the whole body. These two methodologies have been hotly contested lately and for good reason. Both have been proven to have incredible benefits in muscle development, but which training program is the cream of the crop? Lets find out!


We’ll start with Total Body. Total Body training is something that has recently grown in popularity as feats of strength have become increasingly captivating to some of us mere mortals. Seeing Power Lifting juggernauts such as Brian Shaw and Mountain deadlifting over a thousand pounds is something just about anyone can admire with awe, but how can they achieve such incredible power? Well, outside of their natural skills and freakish mutant gifts, their training programs require massive amounts of weights and repetitions of your major lifting movements. The age old principal in lifting is the more you perform and master a movement, the better you will become as well as seeing your strength gains sky rocket! By riding out the total body routine, you’ll be able to increase the frequency of your big 5 lifting movements; the squat, deadlift, bench, rows and overhead press. These movements are the foundation of strength development because the amount of muscles they recruit in order to perform the movement. The squat alone is going to activating muscles in the double digit range.

As the study in the article which we posted on our Instagram stated, Total Body training routines have shown to increase the one rep max of the bench and squat at a much more rapid rate than Split routines. Programming for the Total Body routines is a bit more straight forward as well. Efficiency becomes the most important thing and if you can be one thing, be efficient. Therefore selecting the exercises that recruit the most muscles is gonna give you the most bang for your buck. While this method of training does have a lot of great benefits, there are some things that will come at the Total Body routines detriment. For example, because of the amount of volume you’ll need to do of this primary movements, you’ll be missing out on more of your accessory that is very common in the aesthetically driven principals of the Split Routine, which we will go into further now.


Split Routines have been popularized since the glorious days of bodybuilding’s golden age, back in the 70’s when Arnold was roaming the west coast, making Gold’s Gym a household name. Now much like the training methods of the powerlifters in the Total Body routine, most bodybuilders are genetic anomalies who live in the gym. In the midst of all the macho and bravado, the split routine was born. Split routines grew in popularity because the aesthetically pleasing benefits they have on the individualized muscles that you are able to focus on during each workout. So instead of performing both squats and bench on the same day like you would during a Total Body routine, you’d be hitting chest and tri’s which require you to do not only bench, but incline bench, dumbbell bench, close grip tricep bench and every other benching movement you can think of. Basically, the mentality was to blast the major muscle group you were training that day, in this case it’s chest, then you’d burn out the accessory body parts that you’d be recruiting to assist in that movement. So for chest day, you’d be hitting triceps, as it assists in your pushing movements (Don’t believe me? Go push a door open and feel your chest and your tricep, you’ll feel those bad boys feeling HARD. Plus I just gave your permission to feel yourself up, you’re welcome.)

Now the big benefit in the Split routine is the muscular growth is far superior. In the study by the Journal of Strength and Conditioning Research, the benefits of Split routines were vastly superior in the realm of muscle growth because of the ability to work the muscles to greater fatigue, therefor stimulating greater muscle growth. Now Split routines aren’t without their flaws as a split routine is much harder to stick to if you are busy or may miss days. Your schedule becomes much stricter because missing workouts for certain body parts can cause over development, imbalances and can actually impair muscle growth.


So which is best? Ultimately, whichever routine fits your goals better is going to be what’s best for you. Total Body routines will get you a much stronger, more athletic and functional physique, while a Split routine while focus on more aesthetically pleasing and symmetrical body. Is one greater than the other? No, not necessarily as they both have benefits that the other doesn’t. If neither stands out to you, give them both a three week trial run and see which best fits into your goals and schedule! We have found that the Total Body routine has worked best for us, but that doesn’t mean that a Spilt routine won’t work best for you! At the end of the day, what’s best for you is what matters most! 


Happy Lifting,

Erin and Brady


Black Light Bootcamp is back! This time we’re going full 80’s! We’ll bring the bitchin’ tunes, you just bring that bodacious bod and we’ll have a TOTALLY rad time! Coming to the Optimal Fitness near you, this July 24th at 6:30 pm!

Welcome to Optimal Fitness’s blog!

Let’s Learn To Squat


Why do we squat?

The squat is a movement we experience everyday! From sitting and standing to bending down to pick things up. Squats are essential for movement and are something we will continue to do throughout the entirety of our lives. It is a compound movement which burns more fat, it is a strength exercise that builds every muscle in the lower body and it is a functional movement that improves general body fluidity. The more you squat, the better off you will be!


A squat should always be performed to your comfortability. Not every squat will look the same because we all have different bodies. Some of us have longer legs, some have longer torsos, some of us might have tight hips or lack ankle mobility and some of us may be hyper mobile. The important thing is that we learn to squat to the best of our abilities with the bodies we have.


Step by Step


1. Foot Placement. Slight Toe out 11 and 1 o clock to 10 and 2. (Why? Alignment and range also helping with glute and hamstring activation) *don’t go 12 o clock or any further than 10 and 2


2. Breathing. Suck in, then brace core, exhale upon ascension. (Why? Helps engaged core, while maintaining a stable and neutral spine which is key to proper descent and ascension into a squat) 


3. Break at hips and knees simultaneously. Break at the knees as hips descend don’t overreach through the butt. (Don’t stick your butt out) Why? Hips slightly before knees  makes stability a breeze. Helps engaged hamstrings and glutes.


4. Equal weight distribution between heel, base of big toe and the base of the pinky toe. (Why? Helps maintain position, balance, stability and optimal power to drive straight up) *avoid “going on heels”


5. Keep spine straight. (Why? Keeps core engaged and avoids arching back. Arching back will cause low back pain.)


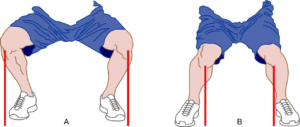
6. Drive knees out. (Why? Keeps knees from going in, activates hips and glutes, keeps knees in line with middle toes) *too much rotation moves foot and hips and can cause foot supination (weight on the outside of your feet.)


7. Break Parallel. Butt should go below the knees. (Why? Full activation of all muscles. Quad flexion happens when the knee bends. Muscle grows during flexion. Helps build more strength. Helps stability in lower back as well as improving flexibility.)


8. Keep head forward while driving up with shoulders on ascension. (Why? Looking up can slide the bar further down your back and put pressure on the shoulders. Looking down can cause the back to round there for breaking down core engagement.)


9. Bar should stay inline with midfoot throughout the entire squat. (Why? The quickest path anywhere is a straight line. By keeping the bar inline with the midfoot, you squat into a straight line from shoulder to foot while maintaining proper form and position with the rest of the body.)


         High Bar                Low Bar


Tips

Try to line up inside of foot with mid shoulder


Hands are there for support, don’t white knuckle it. Squeezing the bar too hard during a squat could hurt your elbows when you increase your weights.


If your knees are parallel with your toes, your ankle mobility will be adequate. If your knee remains at mid foot or ankle, ankle mobility could be an issue.


Don’t stand too narrow because it makes it harder to reach parallel as it makes your levers much longer.

Bring hands closer together and squeeze shoulder blades to keep from bar pressing on spine.


Knees in line with toes


Don’t let the shins stay completely vertical. 


Drive up with shoulders


Always drive straight up


Common mistakes, break downs and fixes

Valgus Knee (Knee caves in) Most often caused by weak glutes

Corrective exercises:

  • Hip Thrusts
  • Band Walks
  • Squats with a band (Press knees out for extra glute work)


Hip shift (pushing to one side upon ascension) Often caused by tightness in certain parts of the body and adductor weakness.

Corrective exercises:

  • For hip tightness refer to mobility exercises.
  • Lateral lunges
  • Sumo deadlift
  • Spanish squats
  • Single leg deadlift to internal rotation of standing leg

Feet turnout on squat aka the Vinny. Is caused mostly by lack of mobility, but can sometimes be caused by weak calves. 


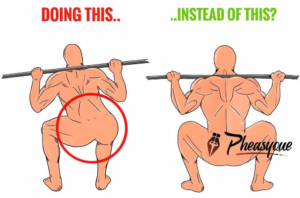
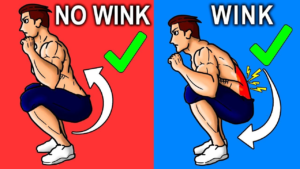
Butt wink. Posterior/Hips tucking under pelvis causing the lower back to round at the bottom of the squat due to tight hamstrings, mobility issues or weak core.


Corrective exercises:

  • Band crunches
  • Weighted V-ups
  • Paloff Press
  • For hips, ankles and hamstrings refer to mobility exercises.
  • TRX Squats

Assessments


For Ankle:

  • Foot five inches from the wall and push knee forward.
  • If your heel comes up before you hit the wall, your ankle mobility is poor.


For Hip:

F.A.B.E.R test (Flexion, Abduction, External, Rotation)

  • Lie on your back and cross your foot over the opposite knee.
  • Check if knees and hips are even.


Thomas Test

  • Pull knee to chest.
  • Opposite leg must remain flat and relaxed


Internal/External test

  • Lie on back in sit up position
  • Rotate hip inward and outward (leg should be able to reach at least 35 degrees)


For Butt Wink:


Horizontal Squat

  • Feet on wall, walk hands back until hips are slightly below parallel with knees 
  • Feel if there are any restrictions to see if mobility is sufficient.


Counter balance

  • Squat with weight in front of you
  • Feel if there is tightness in ankle or hip when straightening back

Back pain when squatting


Proper Warm-up

The most important things to remember for warming up is engagement of the core, mobilization of the hips and stabilization of the ankle. These warm-ups can help in each of those primary factors in a squat in more practical functions.


Light Goblet Squats. Extend a plate out in front of you to help keep the back straight.


Lunge with core rotation.


Side to side leans in a deep squat.


Squat hip raises. Wrap your hands around your ankles and focus on lifting up through the hips.

Stretches for mobility


Hip:

(internal)

  •  Get into a deep squat and press knees out with elbows.


  • Kneel down on all fours, spread your knees apart as far as possible and push weight towards the floor. Push butt back to intensify. 


  • On both knees, step one leg forward at 90 degrees. Push hip towards the ceiling. Lean back to intensify. 

(external)

  • Seated Cross leg hip hinge stretch


  • In a seated position cross one leg on top of the other. Keep knee in line with ankle and push down on the quad. To intensify, lean forward with a straight back.


  • Put both legs at 90 degrees in a seated position and raise back leg up and hold.

Glute:

  • Pigeon pose, on a box or on the floor. With a straight back, lean forward to intensive.


  • Knee hug and twist your upper body towards your leg.


  • Lie on your back, cross one leg across the opposite knee. Lift both feet off the ground and hug leg towards your chest.

Hamstring:

  • Lie on your back, wrap a strap or band around the bottom of your foot and pull your straight leg up as far as you can.


  • In a split stance, push weight into straight leg and lean forward with a straight back.


  • Lie on your back and put leg up straight onto a wall. Move Your body past the wall as far as you can while keeping leg straight.


  • Hands behind your back, keep back and legs straight and lean forward.

Quad:

  • Foot on wall with knee on the ground while the other foot is in front at 90 degrees.


  • Lie face down, wrap a band around your ankle and pull your foot towards your shoulder.


  • Start kneeling, put your hands on your heels and lean you body back into the heels.

Ankle:

  • Raised kneeling forward lean with band.


  • Seated elevated ankle rotations (clockwise and counterclockwise)


  • Ankle banded flexion (with band pull around mid foot point toe out with resistance and ankle extension)


  • With band on top of foot pull toes toward you with flexion at the ankle.


  • With  extended ankles push weight down and sit into heels.


  • Deep Squat with weight, side to side rocks leaning into ankles.


Budget-Savvy Ways To Put Yourself First


You are the most important person in your world, however, you probably don’t treat yourself that way. You should. How you care for yourself directly impacts everything you do 100 percent of the time. And you deserve to be the best version of yourself possible, even if you don’t have a generous budget to indulge. 


Here are some affordable ideas to put you on the right track, presented by Optimal Fitness.


Go to sleep half an hour early.


The average adult needs at least seven hours of sleep each night, per Harvard Health Publishing. Even if you have been getting by on six or less, you will notice a marked difference in your energy levels, mood, and even appetite by settling down a little earlier every night. 


Regardless of what you have going on, schedule your nights around your needs. Turn off the screen and put your phone away by 9 o’clock. Establish a comforting bedtime routine, which might include a warm cup of soothing chamomile tea followed by a few chapters of your favorite book. 


Remember, the time you spend asleep does more than recharge your mind, it allows your body to repair itself. So, in addition to feeling better, you’ll also look your very best, no money required. 


Look after your dental health.


Your dental health is incredibly important, as it can have a direct effect on your overall physical and mental well-being. As such, it’s important (and virtually cost-free) to learn the proper techniques for brushing and flossing to ensure that you’re taking proper care of your teeth. 


It’s equally important to address any oral health concerns that are causing problems. For example, overbite (a common issue for adults where your upper teeth or jaw sticks out further than your lower teeth or jaw) can become severe, leading to additional problems such as jaw pain, difficulty speaking, and discomfort while eating. Thankfully, there are many treatment options to choose from before it gets to that point, such as braces and at-home aligners, while more severe cases may require surgery.


Start exercising if you don’t already.


After a good night of sleep, you will have the energy to exercise your body. This is crucial because exercise is the best way to manage diabetes and stave off many major health problems. And if you are an older adult (age 65 or older), then exercise can do even more. When you participate in programs like SilverSneakers, which is offered by many Medicare Advantage and Medigap plans, you can strengthen your body and improve your balance. This might reduce trips to the ER for falling accidents. One of the best aspects of the SilverSneakers program is that it is included in select plans at no additional cost to you.


No matter your age, starting a yoga practice has many benefits, including improving strength, flexibility, and heart health. It’s also helpful in managing stress and boosting your mood. You can learn from an expert instructor through virtual classes from Liberty Yoga!


Invest in health tech.


Exercise is part of a healthy lifestyle, there is no doubt about that. And technology makes it even easier to reap the rewards of physical activity. The digital age has given us access to everything from smart scales to affordable stationary bikes and activity trackers. These tools can keep you on track, and especially if you would rather skip an outing to the gym and workout from home. If you are on a tight budget, it pays to pay attention to the deals available online for big-box stores, such as Best Buy, Walmart, and Amazon. 


You can find promo codes for everything technology has to offer, including smart scales to help you monitor your BMI and overall weight. By saving a bit extra off their already low prices, you’ll feel even better about your workout.


Become a culinary expert.


There is no substitute for eating the right foods. You can sleep well and exercise every day, but it will all be for naught if you’re eating take-out treats for breakfast, lunch, and dinner. Instead, take the time to learn how to cook. When you don’t want to spend your entire paycheck at the grocery store, you’ll have to learn shop smart as well.  


According to Vox, this starts with buying and cooking in bulk and purposely choosing foods for their nutritional value as well as cost. If you are a meat-eater, look for tougher cuts which are less expensive, such as beef brisket. You can also eat things like beans and eggs, which are high-quality yet inexpensive sources of protein. Like many other staple foods, both of these are versatile and take well to seasoning, so you won’t be stuck with bland and flavorless food each time you sit down for a meal.


Any of these actions taken individually can improve your overall health, wellness, and self-confidence. But combined, they can be the first step toward a better you. As an added perk, you won’t have to waste away your wealth in the process. 


By Jennifer McGregor